If you’ve been inspired by the wave of DIY projects sweeping the nation, you’re probably ready to tackle your next home improvement challenge. The Hampton Bay ceiling fan, a popular Home Depot staple, is a prime candidate for unleashing your inner electrician. It’s time to demystify the tangle of wires and colors, and learn how to safely and confidently wire your ceiling fan.
In this blog post, we’ll guide you through the process, step-by-step, empowering you to take control of your home’s electrical systems. We’ll unravel the mystery behind the different wire colors, explain the safety precautions, and provide you with the knowledge you need to successfully install or troubleshoot your Hampton Bay ceiling fan.
Remember, even the most daunting tasks can be conquered with the right information and a bit of determination. Let’s dive in and transform your ceiling fan wiring project from a potential headache into a satisfying accomplishment.
Acquaint Yourself with Ceiling Fan Cable Colors:
We all know that electrical appliances rely on a network of cables to function, and your Hampton Bay ceiling fan is no exception. However, what sets ceiling fan wiring apart is the array of colors involved. It’s like a rainbow of wires, each with its own specific role to play. If you’re feeling a little overwhelmed by this colorful tangle, don’t worry – we’re here to break it down for you.
Wires from the House:
Black Wire (Hot): This is the main power source for your ceiling fan, connecting it to the switch outlet.
White Wire (Neutral): The neutral wire completes the circuit, directing any unused electricity back to the breaker box.
Green Wire (Ground): This insulated wire provides a safe path for excess electricity to flow in case of a fault, protecting you and your fan from electrical shock.
Blue or Black Wire: If you see a second black or a blue wire coming from your ceiling, it indicates that your fan setup includes two wall switches.
Red Wire (Secondary Hot): This wire is typically used in fans controlled by a wall switch.
Wires from the Fan:
- Black Wire: This wire is responsible for powering the fan motor itself.
- Blue Wire: If your fan has a light fixture, this wire connects to it.
- White Wire (Neutral): Similar to the white wire from the house, this neutral wire completes the circuit within the fan.
- Green Wire (Ground): Again, this wire provides grounding for the fan, ensuring safety.
- Red Wire: This wire also plays a role in powering the light fixture, acting as a secondary power source.
Understanding the purpose of each wire color is crucial for successful ceiling fan installation or troubleshooting. Now that you’ve got the color code cracked, you’re one step closer to mastering your Hampton Bay ceiling fan wiring project!
Gear up to Wire a Ceiling Fan:
Before you embark on your ceiling fan wiring adventure, it’s crucial to prioritize safety. Remember, successful wiring isn’t just about connecting the right colors; it’s about handling electrical components with care and respect. In this section, we’ll cover the fundamental safety measures that lay the groundwork for a secure and incident-free wiring experience.
- Power Down: The first and most critical step is to turn off the power supply to the fan at the breaker box. Locate the correct breaker (usually labeled) and switch it to the “off” position. If you’re unsure which breaker controls the fan, consult a qualified electrician.
- Seek Expert Advice: If you have any doubts or concerns about the wiring process, don’t hesitate to reach out to a professional electrician. A brief consultation can prevent potentially dangerous mistakes.
- Careful Stripping: When stripping the insulation from the wires, use a wire stripper and remove only about 1cm (0.39 in) of insulation to expose the copper ends. Avoid nicking or damaging the wires.
- Cap Unused Wires: Any unused or exposed wires should be properly capped with wire nuts or electrical tape to prevent accidental contact and potential shocks.
- Gather Supplies: Make sure you have the necessary tools and materials, including wire nuts, push connectors (if applicable), and a voltage tester to confirm that the power is indeed off.
- Consult the Manual: Always refer to the manufacturer’s instructions for your specific Hampton Bay ceiling fan model. Wiring color codes can vary, so it’s essential to follow the provided guidelines.
Installing a Fan or Light with Pull Chain Assembly:
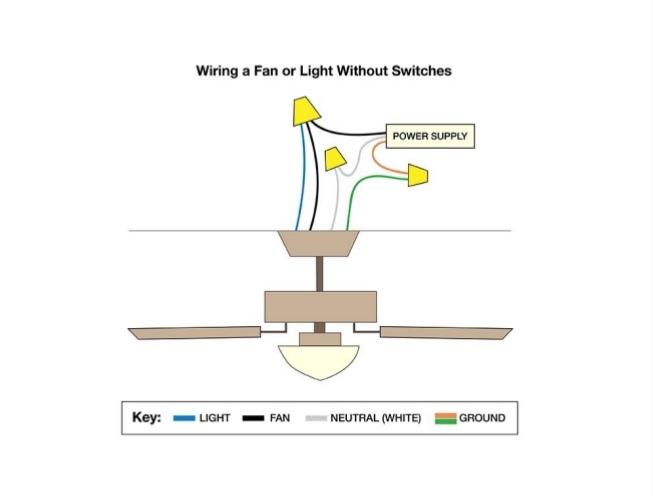
Pull chain fans exude a certain charm, but their wiring can be a bit trickier than standard models. Don’t worry, though; with a bit of guidance and a refresher on those color codes, you’ll have it mastered in no time. This guide focuses on wiring a pull chain fan without a wall switch, meaning you’ll control the fan and any attached lights directly from the pull chains.
Let’s Get Started:
- Neutral Connection: Begin by connecting the white (neutral) wire from the ceiling fan to the white (neutral) wire coming from your ceiling. Secure the connection with a wire nut.
- Grounding: Next, connect the green (ground) wire from the fan to the bare copper or green (ground) wire in your ceiling box. Again, use a wire nut to secure the connection. If your box has a grounding screw, you can also connect the ground wire to that.
- Fan Power: Now, it’s time to connect the black (hot) wire from the fan to the black (hot) wire from your ceiling. Securely fasten these with a wire nut and then wrap the connection with electrical tape for added safety.
- Light Kit Preparation: Even if you don’t currently have a light kit installed, it’s a good idea to prepare for one in the future. Connect the blue wire from the fan to either the blue or black wire (depending on your house wiring) coming from the ceiling. Secure this connection with a wire nut.
- Tuck and Test: Once all connections are made and secured, carefully tuck the wires into the ceiling fan housing. Mount the fan, turn on the power at the breaker, and test the pull chains to ensure everything works as expected.
Installing a Pull Chain Fan with Switch Operated Light:
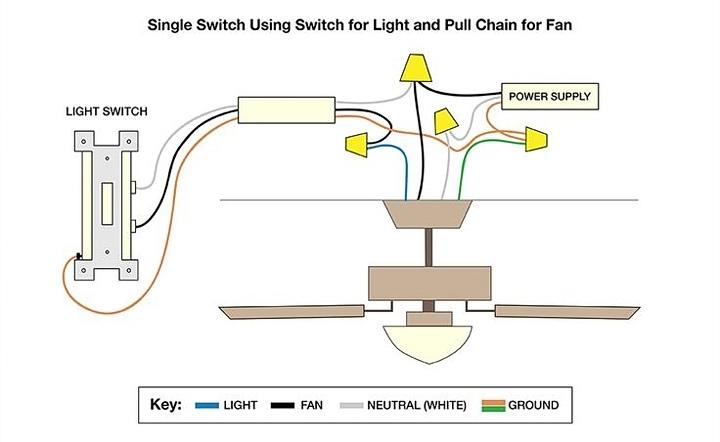
For those who prefer the convenience of a wall switch to control their ceiling fan light, this wiring scenario is for you. It adds a layer of complexity compared to the pull chain setup, but with clear instructions and careful attention, you’ll be able to achieve a professional installation.
Key Points:
Switch Leg: To enable switch control for the light kit, we’ll introduce a “switch leg” – an additional wire (often red) that runs between the switch and the fan, providing power specifically to the light.
Wire Nut Connections: As before, we’ll use wire nuts to securely join the wires together.
Color Coding: Remember to pay close attention to the color coding, as it’s crucial for correct wiring.
Step-by-Step:
- Identify the Switch Leg: The red wire (or sometimes a different color, consult your manual) from the ceiling is the switch leg. It connects to the switch and carries power to the light kit when the switch is turned on.
- Grounding: Connect the green (ground) wires from the fan and the ceiling box together using a wire nut. Ensure a secure connection.
- Neutral Connection: Join the white (neutral) wires from the fan and the ceiling together with a wire nut.
- Fan Power: Connect the black (hot) wire from the fan to the black (hot) wire from the ceiling. Secure with a wire nut.
- Light Kit Connection: Connect the black wire from the light kit to the red (switch leg) wire from the ceiling. Secure with a wire nut.
- Fan and Light Neutral: Connect the white wire from the light kit to the white wire from the fan. Secure with a wire nut.
- Tuck and Test: Carefully tuck all the connected wires into the fan housing. Mount the fan, turn on the power at the breaker, and test both the fan pull chain and the wall switch to confirm everything operates correctly.
Installing Ceiling Fan and Light Actuated with a single switch:
This wiring configuration is perfect for areas where you want both the fan and the light to operate simultaneously with the flick of a single switch. It’s particularly convenient for spaces like dining rooms or living rooms, where you often desire both illumination and air circulation at the same time. Let’s explore the wiring steps involved.
Wiring Steps:
- Grounding: As always, safety first! Begin by connecting the green (ground) wires from the fan and the ceiling box using a wire nut. Ensure a secure connection.
- Neutral Connection: Join the white (neutral) wires from the fan, the light kit, and the ceiling together with a wire nut. This creates a common neutral path for both the fan and the light.
- Fan and Light Power: Connect the black (hot) wires from the fan and the light kit to the black (hot) wire from the ceiling. Secure all three wires together with a wire nut. This allows both the fan and the light to receive power from the same switch.
- Tuck and Test: Carefully tuck all the connected wires into the fan housing. Mount the fan, turn on the power at the breaker, and test the wall switch. Both the fan and the light should turn on and off together.
Key Points:
- Simplified Control: This setup eliminates the need for pull chains, providing a streamlined and convenient way to operate both the fan and the light.
- Single Switch: Remember, with this configuration, a single wall switch will control both the fan and the light simultaneously.
- Ideal for Specific Spaces: This wiring option is well-suited for areas where you typically want both the fan and light to be on or off at the same time.
By following these steps and paying attention to the connections, you’ll successfully wire your Hampton Bay ceiling fan and light kit to operate from a single switch.
Installing Ceiling Fan and Light Actuated with different switches:
Now, this separate switch option is great for your bedrooms and kitchen. Where you want the light and fan to operate separately, you can adjust the fan speed without turning on the lights. If that’s not impressive enough, don’t worry; we have not finished yet. Additionally, you can install a dimmer for your light kit if you want. Before we dig deep into the details of electrical connections, here’s a cycle you need to understand.
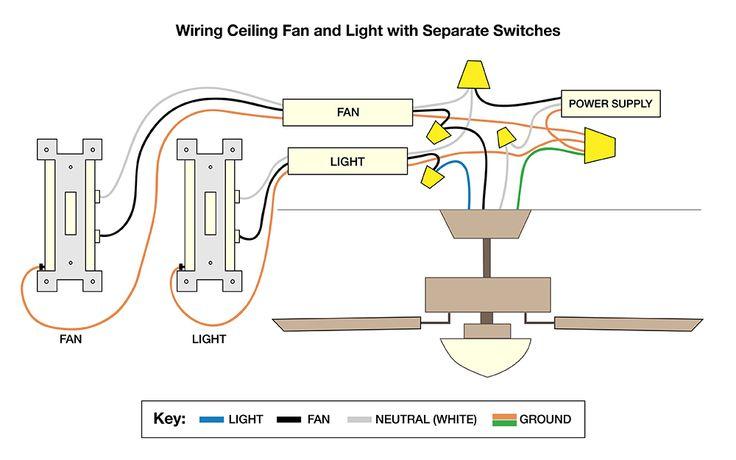
For ultimate control over your ceiling fan and light, wiring them to separate switches is the way to go. This setup allows you to operate each component independently, providing flexibility and customization to match your needs.
Wiring Steps:
- Grounding: As always, prioritize safety. Connect the green (ground) wires from the fan, the light kit, and the ceiling box together using a wire nut. Ensure a secure connection.
- Neutral Connection: Join the white (neutral) wires from the fan, the light kit, and the ceiling together with a wire nut. This creates a common neutral path for both the fan and the light.
- Fan Power: Connect the black (hot) wire from the fan to the black (hot) wire coming from switch #1. Secure with a wire nut.
- Light Power: Connect the black wire from the light kit to the red (or other designated color) wire coming from switch #2. Secure with a wire nut.
- Tuck and Test: Carefully tuck all the connected wires into the fan housing. Mount the fan, turn on the power at the breaker, and test each switch individually. The fan should operate with switch #1, and the light should operate with switch #2.
Switch Box Connections:
- Hot Wire to Switches: Connect the incoming hot wire (usually black) from the power source to the common terminal on each switch. You might need to split the hot wire into a “Y” configuration to connect it to both switches.
- Switch #1 to Fan: Connect the black wire from switch #1 to the black wire going to the fan. Secure with a wire nut.
- Switch #2 to Light: Connect the red (or other designated color) wire from switch #2 to the black wire going to the light kit. Secure with a wire nut.
- Neutral Connections: Connect all the white (neutral) wires in the switch box together with a wire nut.
- Ground Connections: Connect all the green (ground) wires or bare copper wires in the switch box together with a wire nut.
- Tuck and Test: Carefully tuck all the wires into the switch box. Install the switch cover plate, turn on the power at the breaker, and test each switch again to ensure proper operation.
Installing a Remote-controlled Ceiling Fan:
Hampton Bay’s commitment to innovation shines through in their remote-controlled ceiling fans. These fans aren’t just stylish additions to your home; they offer a level of convenience that benefits everyone, especially those with limited mobility. Imagine adjusting the fan speed or turning on the light without having to leave the comfort of your seat – it’s a game-changer!
Let’s delve into the steps involved in installing a Hampton Bay ceiling fan with remote control:
- Safety First: Power Down: Before you begin any electrical work, locate the breaker that controls the ceiling fan and switch it off. This ensures your safety throughout the installation process.
- Prepare the Remote Receiver: Carefully examine the remote receiver. You’ll likely find DIP switches (small toggle switches) and push buttons that need to be set according to the instructions provided with your fan. Also, insert the appropriate batteries into the remote control.
- Install the Fan: Mount the ceiling fan onto the ceiling box following the manufacturer’s instructions.
- Position the Receiver: Gently push the remote receiver into the space above the metal downrod within the fan housing. Make sure it’s securely in place.
- Connect the Wires: Carefully match and connect the wires from the fan to the corresponding wires on the remote receiver. Refer to the wiring diagram provided with your fan for specific instructions. Double-check all connections to ensure they are secure.
- Power On and Test: Once all connections are made, turn on the power at the breaker and test the remote control. The fan and light (if applicable) should respond to the commands from the remote.
Key Points:
- Convenience: Remote-controlled ceiling fans offer unparalleled convenience, allowing you to adjust settings from anywhere in the room.
- Accessibility: These fans are particularly beneficial for individuals with mobility limitations, making it easier to control their environment.
- Follow Instructions: Always refer to the specific instructions provided with your Hampton Bay ceiling fan and remote control for accurate installation and programming.
By following these steps and taking necessary precautions, you’ll successfully install your remote-controlled ceiling fan. Enjoy the comfort, convenience, and modern touch it adds to your living space.
Appropriate Tools and Orange Safety Tips:
Just as a surgeon wouldn’t enter the operating room without their instruments, you shouldn’t embark on a ceiling fan wiring project without the right tools and a solid understanding of safety protocols. Preparation is key to a smooth and successful installation.
Essential Tools:
- Screwdriver: A Phillips head screwdriver is typically needed for securing the fan to the ceiling box and connecting wires.
- Wire Strippers: These are essential for carefully removing the insulation from the wires, exposing the copper conductors for connections.
- Electrical Tape: Use electrical tape to insulate and secure wire connections, providing an additional layer of protection.
- Voltage Tester: This handy tool confirms that the power is off at the ceiling box before you begin working, ensuring your safety.
- Ladder: A sturdy ladder is necessary to reach the ceiling safely and comfortably.
- Optional Tools: Needle-nose pliers can be helpful for bending and manipulating wires, while wire connectors (such as wire nuts or push connectors) provide secure and reliable connections.
Safety Considerations:
- Eye and Hand Protection: Always wear safety glasses to protect your eyes from debris and dust, and rubber gloves to insulate your hands from electrical shock.
- Individual Junction Boxes: If installing multiple ceiling fans, each fan should have its own dedicated junction box.
- Wiring Knowledge: Familiarize yourself with the wiring color codes and consult the fan’s manual for specific instructions.
- Fan Height: Ensure the installed fan is at least 8 feet above the floor to prevent accidental contact with the blades.
- Avoid Overloading: Don’t hang any objects or tools from the fan, as this can put unnecessary strain on the motor and potentially cause damage.
Remember, your safety is paramount. Electricity can be dangerous if mishandled, so always exercise caution and follow proper safety procedures. If you have any doubts or concerns, consult a qualified electrician for assistance.
Upgrade Your Comfort with Hampton Bay:
Ceiling fans are your allies against the summer heat, providing a refreshing breeze and enhancing your comfort. Consider upgrading your fan or adding new features with Hampton Bay’s extensive selection of accessories. By following these guidelines and equipping yourself with the necessary tools and knowledge. You’ll be well-prepared to tackle your ceiling fan wiring project with confidence and achieve a successful installation.
Ceiling fans are sincere partners in summer that keep you safe from the curse of scorching heat with their airflow. Upgrading the ceiling fan hardware and making amendments with top-notch Hampton Bay Ceiling Fan features can skyrocket your comfort. If you plan to bring accessories home, installing the Home Depot Mobile App and visiting the Home Depot Official Website is your way to go!
Conclusion
Congratulations on taking the initiative to learn about Hampton Bay ceiling fan wiring! Armed with this knowledge, you’re now equipped to tackle your next home improvement project with confidence. Remember, whether you’re installing a new fan, troubleshooting an existing one, or adding a remote control or light kit, understanding the wiring is key to a successful and safe installation.
Prioritize safety, follow the instructions carefully, and don’t hesitate to seek help from a qualified electrician if you encounter any challenges. With a little patience and attention to detail, you’ll be able to enjoy the comfort and functionality of your Hampton Bay ceiling fan for years to come.
Remember, the DIY journey is all about empowerment. Embrace the challenge, learn new skills, and transform your living space with your own two hands. Happy wiring!